Datasette Lite: a server-side Python web application running in a browser
4th May 2022
Datasette Lite is a new way to run Datasette: entirely in a browser, taking advantage of the incredible Pyodide project which provides Python compiled to WebAssembly plus a whole suite of useful extras.
You can try it out here:
Update 20th June 2022: Datasette Lite can now load CSV files directly by URL, see Joining CSV files in your browser using Datasette Lite for details.
Update 17th August 2022: It can now load Datasette plugins as well.
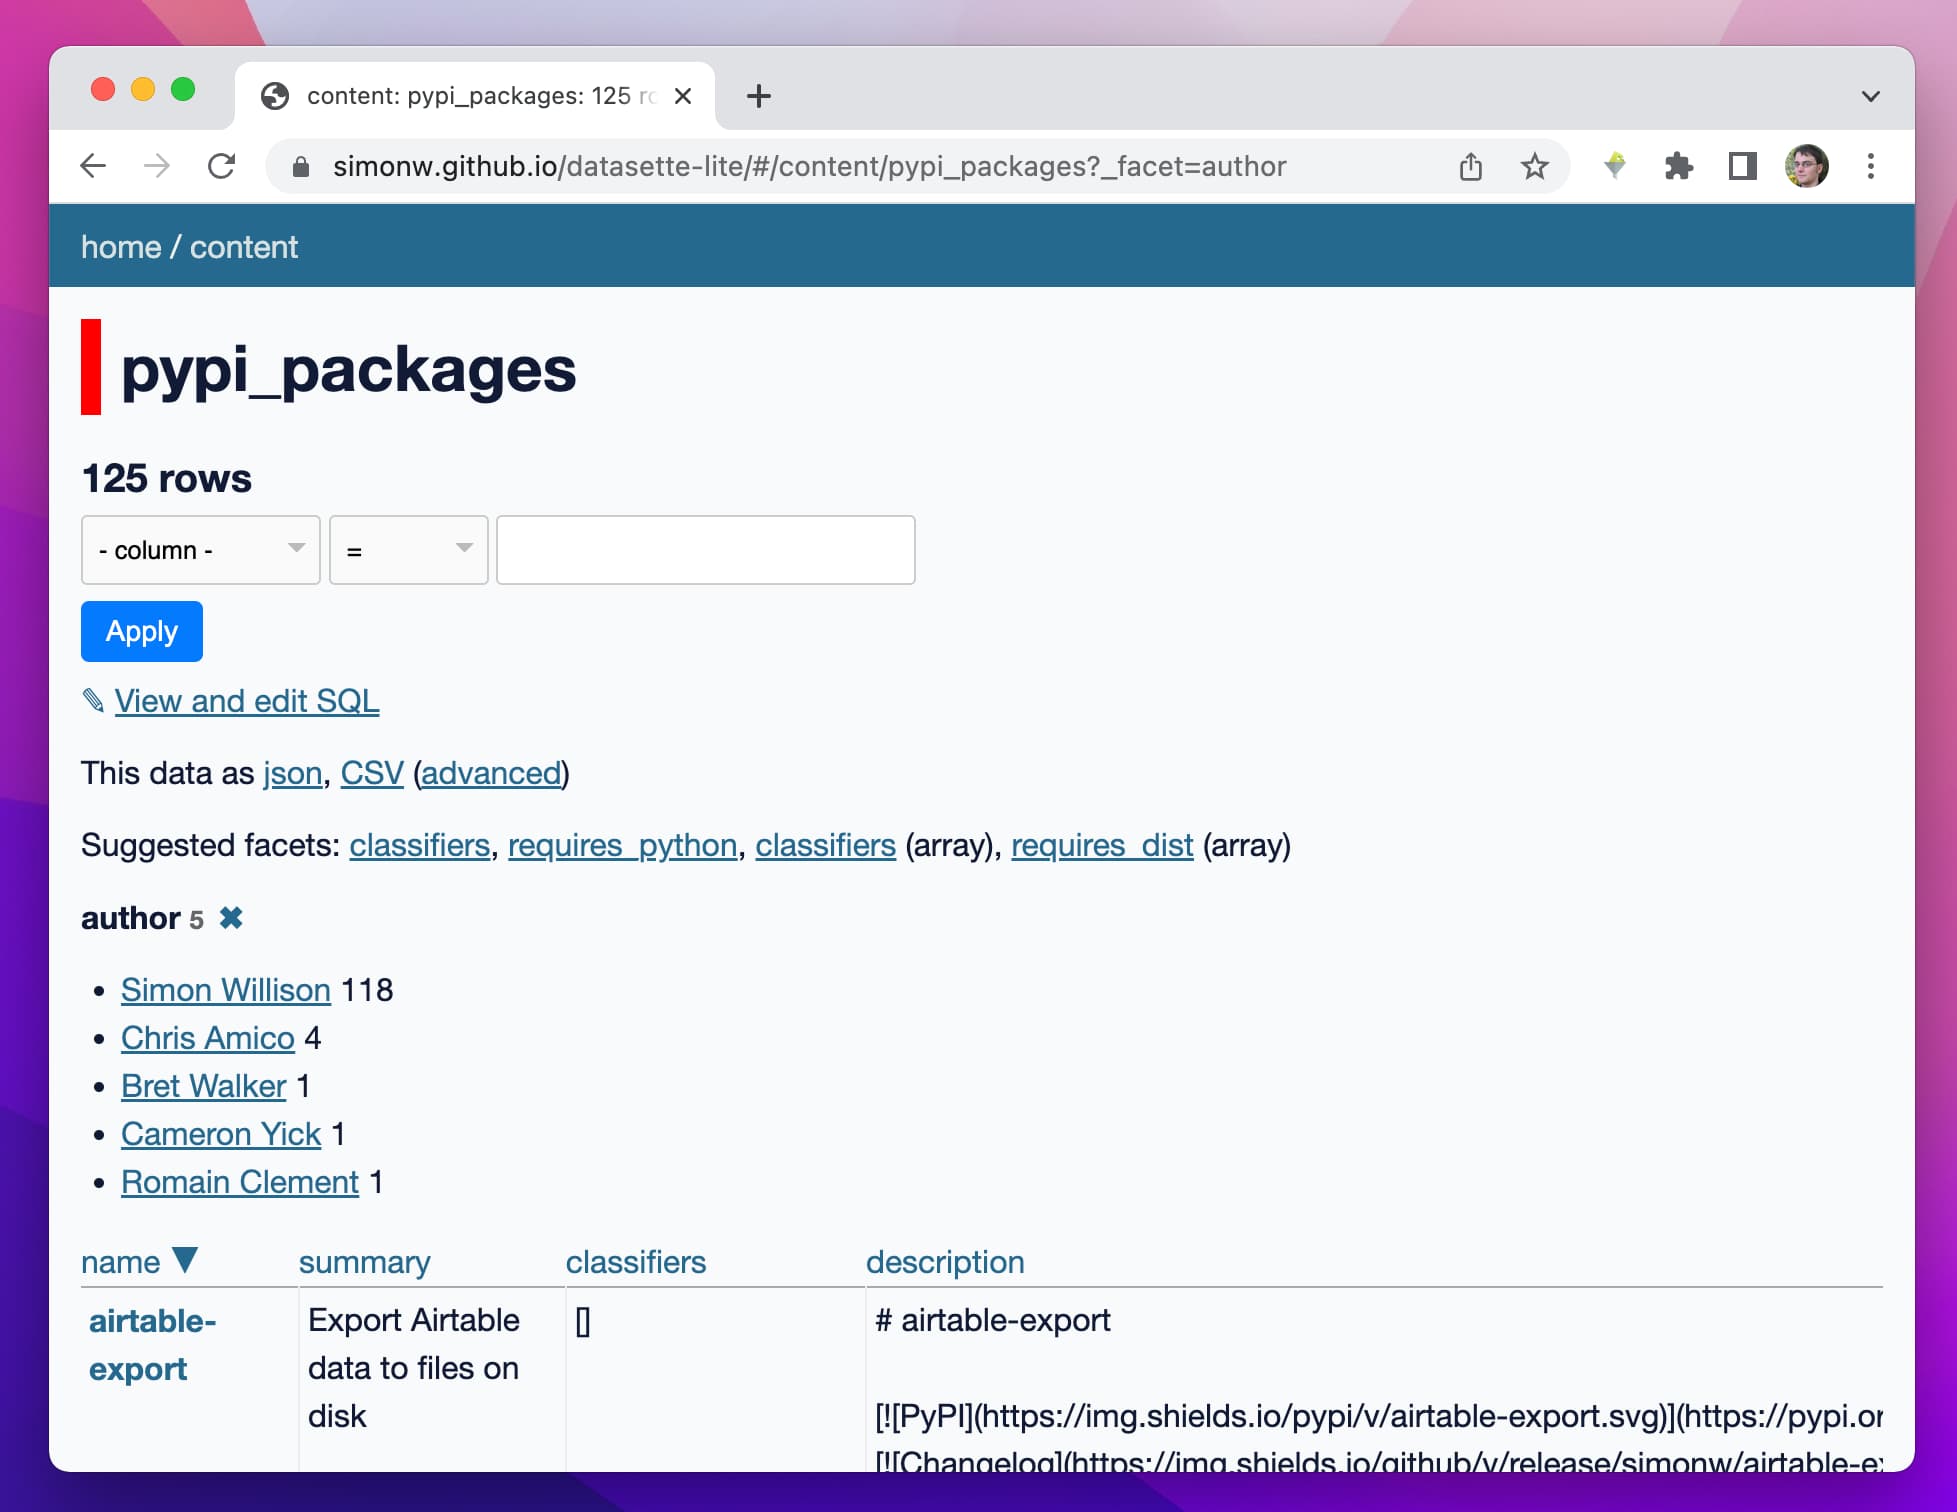
The initial example loads two databases—the classic fixtures.db used by the Datasette test suite, and the content.db database that powers the official datasette.io website (described in some detail in my post about Baked Data).
You can instead use the “Load database by URL to a SQLite DB” button to paste in a URL to your own database. That file will need to be served with CORS headers that allow it to be fetched by the website (see README).
Try this URL, for example:
https://congress-legislators.datasettes.com/legislators.db
You can follow this link to open that database in Datasette Lite.
Datasette Lite supports almost all of Datasette’s regular functionality: you can view tables, apply facets, run your own custom SQL results and export the results as CSV or JSON.
It’s basically the full Datasette experience, except it’s running entirely in your browser with no server (other than the static file hosting provided here by GitHub Pages) required.
I’m pretty stunned that this is possible now.
I had to make some small changes to Datasette to get this to work, detailed below, but really nothing extravagant—the demo is running the exact same Python code as the regular server-side Datasette application, just inside a web worker process in a browser rather than on a server.
The implementation is pretty small—around 300 lines of JavaScript. You can see the code in the simonw/datasette-lite repository—in two files, index.html and webworker.js
Why build this?
I built this because I want as many people as possible to be able to use my software.
I’ve invested a ton of effort in reducing the friction to getting started with Datasette. I’ve documented the install process, I’ve packaged it for Homebrew, I’ve written guides to running it on Glitch, I’ve built tools to help deploy it to Heroku, Cloud Run, Vercel and Fly.io. I even taught myself Electron and built a macOS Datasette Desktop application, so people could install it without having to think about their Python environment.
Datasette Lite is my latest attempt at this. Anyone with a browser that can run WebAssembly can now run Datasette in it—if they can afford the 10MB load (which in many places with metered internet access is way too much).
I also built this because I’m fascinated by WebAssembly and I’ve been looking for an opportunity to really try it out.
And, I find this project deeply amusing. Running a Python server-side web application in a browser still feels like an absurd thing to do. I love that it works.
I’m deeply inspired by JupyterLite. Datasette Lite’s name is a tribute to that project.
How it works: Python in a Web Worker
Datasette Lite does most of its work in a Web Worker—a separate process that can run expensive CPU operations (like an entire Python interpreter) without blocking the main browser’s UI thread.
The worker starts running when you load the page. It loads a WebAssembly compiled Python interpreter from a CDN, then installs Datasette and its dependencies into that interpreter using micropip.
It also downloads the specified SQLite database files using the browser’s HTTP fetching mechanism and writes them to a virtual in-memory filesystem managed by Pyodide.
Once everything is installed, it imports datasette and creates a Datasette() object called ds. This object stays resident in the web worker.
To render pages, the index.html page sends a message to the web worker specifying which Datasette path has been requested—/ for the homepage, /fixtures for the database index page, /fixtures/facetable for a table page and so on.
The web worker then simulates an HTTP GET against that path within Datasette using the following code:
response = await ds.client.get(path, follow_redirects=True)
This takes advantage of a really useful internal Datasette API: datasette.client is an HTTPX client object that can be used to execute HTTP requests against Datasette internally, without doing a round-trip across the network.
I initially added datasette.client with the goal of making any JSON APIs that Datasette provides available for internal calls by plugins as well, and to make it easier to write automated tests. It turns out to have other interesting applications too!
The web worker sends a message back to index.html with the status code, content type and content retrieved from Datasette. JavaScript in index.html then injects that HTML into the page using .innerHTML.
To get internal links working, Datasette Lite uses a trick I originally learned from jQuery: it applies a capturing event listener to the area of the page displaying the content, such that any link clicks or form submissions will be intercepted by a JavaScript function. That JavaScript can then turn them into new messages to the web worker rather than navigating to another page.
Some annotated code
Here are annotated versions of the most important pieces of code. In index.html this code manages the worker and updates the page when it recieves messages from it:
// Load the worker script
const datasetteWorker = new Worker("webworker.js");

// Extract the ?url= from the current page's URL
const initialUrl = new URLSearchParams(location.search).get('url');

// Message that to the worker: {type: 'startup', initialUrl: url}
datasetteWorker.postMessage({type: 'startup', initialUrl});

// This function does most of the work - it responds to messages sent
// back from the worker to the index page:
datasetteWorker.onmessage = (event) => {
  // {type: log, line: ...} messages are appended to a log textarea:
  var ta = document.getElementById('loading-logs');
  if (event.data.type == 'log') {
    loadingLogs.push(event.data.line);
    ta.value = loadingLogs.join("\n");
    ta.scrollTop = ta.scrollHeight;
    return;
  }
  let html = '';
  // If it's an {error: ...} message show it in a <pre> in a <div>
  if (event.data.error) {
    html = `<div style="padding: 0.5em"><h3>Error</h3><pre>${escapeHtml(event.data.error)}</pre></div>`;
  // If contentType is text/html, show it as straight HTML
  } else if (/^text\/html/.exec(event.data.contentType)) {
    html = event.data.text;
  // For contentType of application/json parse and pretty-print it
  } else if (/^application\/json/.exec(event.data.contentType)) {
    html = `<pre style="padding: 0.5em">${escapeHtml(JSON.stringify(JSON.parse(event.data.text), null, 4))}</pre>`;
  // Anything else (likely CSV data) escape it and show in a <pre>
  } else {
    html = `<pre style="padding: 0.5em">${escapeHtml(event.data.text)}</pre>`;
  }
  // Add the result to <div id="output"> using innerHTML
  document.getElementById("output").innerHTML = html;
  // Update the document.title if a <title> element is present
  let title = document.getElementById("output").querySelector("title");
  if (title) {
    document.title = title.innerText;
  }
  // Scroll to the top of the page after each new page is loaded
  window.scrollTo({top: 0, left: 0});
  // If we're showing the initial loading indicator, hide it
  document.getElementById('loading-indicator').style.display = 'none';
};
The webworker.js script is where the real magic happens:
// Load Pyodide from the CDN
importScripts("https://cdn.jsdelivr.net/pyodide/dev/full/pyodide.js");

// Deliver log messages back to the index.html page
function log(line) {
  self.postMessage({type: 'log', line: line});
}

// This function initializes Pyodide and installs Datasette
async function startDatasette(initialUrl) {
  // Mechanism for downloading and saving specified DB files
  let toLoad = [];
  if (initialUrl) {
    let name = initialUrl.split('.db')[0].split('/').slice(-1)[0];
    toLoad.push([name, initialUrl]);
  } else {
    // If no ?url= provided, loads these two demo databases instead:
    toLoad.push(["fixtures.db", "https://latest.datasette.io/fixtures.db"]);
    toLoad.push(["content.db", "https://datasette.io/content.db"]);
  }
  // This does a LOT of work - it pulls down the WASM blob and starts it running
  self.pyodide = await loadPyodide({
    indexURL: "https://cdn.jsdelivr.net/pyodide/dev/full/"
  });
  // We need these packages for the next bit of code to work
  await pyodide.loadPackage('micropip', log);
  await pyodide.loadPackage('ssl', log);
  await pyodide.loadPackage('setuptools', log); // For pkg_resources
  try {
    // Now we switch to Python code
    await self.pyodide.runPythonAsync(`
    # Here's where we download and save those .db files - they are saved
    # to a virtual in-memory filesystem provided by Pyodide

    # pyfetch is a wrapper around the JS fetch() function - calls using
    # it are handled by the browser's regular HTTP fetching mechanism
    from pyodide.http import pyfetch
    names = []
    for name, url in ${JSON.stringify(toLoad)}:
        response = await pyfetch(url)
        with open(name, "wb") as fp:
            fp.write(await response.bytes())
        names.append(name)

    import micropip
    # Workaround for Requested 'h11<0.13,>=0.11', but h11==0.13.0 is already installed
    await micropip.install("h11==0.12.0")
    # Install Datasette itself!
    await micropip.install("datasette==0.62a0")
    # Now we can create a Datasette() object that can respond to fake requests
    from datasette.app import Datasette
    ds = Datasette(names, settings={
        "num_sql_threads": 0,
    }, metadata = {
        # This metadata is displayed in Datasette's footer
        "about": "Datasette Lite",
        "about_url": "https://github.com/simonw/datasette-lite"
    })
    `);
    datasetteLiteReady();
  } catch (error) {
    self.postMessage({error: error.message});
  }
}

// Outside promise pattern
// https://github.com/simonw/datasette-lite/issues/25#issuecomment-1116948381
let datasetteLiteReady;
let readyPromise = new Promise(function(resolve) {
  datasetteLiteReady = resolve;
});

// This function handles messages sent from index.html to webworker.js
self.onmessage = async (event) => {
  // The first message should be that startup message, carrying the URL
  if (event.data.type == 'startup') {
    await startDatasette(event.data.initialUrl);
    return;
  }
  // This promise trick ensures that we don't run the next block until we
  // are certain that startDatasette() has finished and the ds.client
  // Python object is ready to use
  await readyPromise;
  // Run the reuest in Python to get a status code, content type and text
  try {
    let [status, contentType, text] = await self.pyodide.runPythonAsync(
      `
      import json
      # ds.client.get(path) simulates running a request through Datasette
      response = await ds.client.get(
          # Using json here is a quick way to generate a quoted string
          ${JSON.stringify(event.data.path)},
          # If Datasette redirects to another page we want to follow that
          follow_redirects=True
      )
      [response.status_code, response.headers.get("content-type"), response.text]
      `
    );
    // Message the results back to index.html
    self.postMessage({status, contentType, text});
  } catch (error) {
    // If an error occurred, send that back as a {error: ...} message
    self.postMessage({error: error.message});
  }
};
One last bit of code: here’s the JavaScript in index.html which intercepts clicks on links and turns them into messages to the worker:
let output = document.getElementById('output');
// This captures any click on any element within <div id="output">
output.addEventListener('click', (ev => {
  // .closest("a") traverses up the DOM to find if this is an a
  // or an element nested in an a. We ignore other clicks.
  var link = ev.srcElement.closest("a");
  if (link && link.href) {
    // It was a click on a <a href="..."> link! Cancel the event:
    ev.stopPropagation();
    ev.preventDefault();
    // I want #fragment links to still work, using scrollIntoView()
    if (isFragmentLink(link.href)) {
      // Jump them to that element, but don't update the URL bar
      // since we use # in the URL to mean something else
      let fragment = new URL(link.href).hash.replace("#", "");
      if (fragment) {
        let el = document.getElementById(fragment);
        el.scrollIntoView();
      }
      return;
    }
    let href = link.getAttribute("href");
    // Links to external sites should open in a new window
    if (isExternal(href)) {
      window.open(href);
      return;
    }
    // It's an internal link navigation - send it to the worker
    loadPath(href);
  }
}), true);

function loadPath(path) {
  // We don't want anything after #, and we only want the /path
  path = path.split("#")[0].replace("http://localhost", "");
  // Update the URL with the new # location
  history.pushState({path: path}, path, "#" + path);
  // Plausible analytics, see:
  // https://github.com/simonw/datasette-lite/issues/22
  useAnalytics && plausible('pageview', {u: location.href.replace('?url=', '').replace('#', '/')});
  // Send a {path: "/path"} message to the worker
  datasetteWorker.postMessage({path});
}
Getting Datasette to work in Pyodide
Pyodide is the secret sauce that makes this all possible. That project provides several key components:
- A custom WebAssembly build of the core Python interpreter, bundling the standard library (including a compiled WASM version of SQLite)
- micropip—a package that can install additional Python dependencies by downloading them from PyPI
- A comprehensive JavaScript to Python bridge, including mechanisms for translating Python objects to JavaScript and vice-versa
- A JavaScript API for launching and then managing a Python interpreter process
I found the documentation on Using Pyodide in a web worker particularly helpful.
I had to make a few changes to Datasette to get it working with Pyodide. My tracking issue for that has the full details, but the short version is:
- Ensure each of Datasette’s dependencies had a wheel package on PyPI (as opposed to just a
.tar.gz)—micropiponly works with wheels. I ended up removingpython-baseconvas a dependency and replacingclick-default-groupwith my ownclick-default-group-wheelforked package (repo here). I gotsqlite-utilsworking in Pyodide with this change too, see the 3.26.1 release notes. - Work around an error caused by importing
uvicorn. Since Datasette Lite doesn’t actually run its own web server that dependency wasn’t necessary, so I changed my code to catch theImportErrorin the right place. - The biggest change: WebAssembly can’t run threads, which means Python can’t run threads, which means any attempts to start a thread in Python cause an error. Datasette only uses threads in one place: to execute SQL queries in a thread pool where they won’t block the event loop. I added a new
--setting num_sql_threads 0feature for disabling threading entirely, see issue 1735.
Having made those changes I shipped them in a Datasette 0.62a0 release. It’s this release that Datasette Lite installs from PyPI.
Fragment hashes for navigation
You may have noticed that as you navigate through Datasette Lite the URL bar updates with URLs that look like the following:
https://lite.datasette.io/#/content/pypi_packages?_facet=author
I’m using the # here to separate out the path within the virtual Datasette instance from the URL to the Datasette Lite application itself.
Maintaining the state in the URL like this means that the Back and Forward browser buttons work, and also means that users can bookmark pages within the application and share links to them.
I usually like to avoid # URLs—the HTML history API makes it possible to use “real” URLs these days, even for JavaScript applications. But in the case of Datasette Lite those URLs wouldn’t actually work—if someone attempted to refresh the page or navigate to a link GitHub Pages wouldn’t know what file to serve.
I could run this on my own domain with a catch-all page handler that serves the Datasette Lite HTML and JavaScript no matter what path is requested, but I wanted to keep this as pure and simple as possible.
This also means I can reserve Datasette Lite’s own query string for things like specifying the database to load, and potentially other options in the future.
Web Workers or Service Workers?
My initial idea for this project was to build it with Service Workers.
Service Workers are some deep, deep browser magic: they let you install a process that can intercept browser traffic to a specific domain (or path within that domain) and run custom code to return a result. Effectively they let you run your own server-side code in the browser itself.
They’re mainly designed for building offline applications, but my hope was that I could use them to offer a full simulation of a server-side application instead.
Here’s my TIL on Intercepting fetch in a service worker that came out of my initial research.
I managed to get a server-side JavaScript “hello world” demo working, but when I tried to add Pyodide I ran into some unavoidable road blocks. It turns out Service Workers are very restricted in which APIs they provide—in particular, they don’t allow XMLHttpRequest calls. Pyodide apparently depends on XMLHttpRequest, so it was unable to run in a Service Worker at all. I filed an issue about it with the Pyodide project.
Initially I thought this would block the whole project, but eventually I figured out a way to achieve the same goals using Web Workers instead.
Is this an SPA or an MPA?
SPAs are Single Page Applications. MPAs are Multi Page Applications. Datasette Lite is a weird hybrid of the two.
This amuses me greatly.
Datasette itself is very deliberately architected as a multi page application.
I think SPAs, as developed over the last decade, have mostly been a mistake. In my experience they take longer to build, have more bugs and provide worse performance than a server-side, multi-page alternative implementation.
Obviously if you are building Figma or VS Code then SPAs are the right way to go. But most web applications are not Figma, and don’t need to be!
(I used to think Gmail was a shining example of an SPA, but it’s so sludgy and slow loading these days that I now see it as more of an argument against the paradigm.)
Datasette Lite is an SPA wrapper around an MPA. It literally simulates the existing MPA by running it in a web worker.
It’s very heavy—it loads 11MB of assets before it can show you anything. But it also inherits many of the benefits of the underlying MPA: it has obvious distinctions between pages, a deeply interlinked interface, working back and forward buttons, it’s bookmarkable and it’s easy to maintain and add new features.
I’m not sure what my conclusion here is. I’m skeptical of SPAs, and now I’ve built a particularly weird one. Is this even a good idea? I’m looking forward to finding that out for myself.
Coming soon: JavaScript!
Another amusing detail about Datasette Lite is that the one part of Datasette that doesn’t work yet is Datasette’s existing JavaScript features!
Datasette currently makes very sparing use of JavaScript in the UI: it’s used to add some drop-down interactive menus (including the handy “cog” menu on column headings) and for a CodeMirror-enhanced SQL editing interface.
JavaScript is used much more extensively by several popular Datasette plugins, including datasette-cluster-map and datasette-vega.
Unfortunately none of this works in Datasette Lite at the moment—because I don’t yet have a good way to turn <script src="..."> links into things that can load content from the Web Worker.
This is one of the reasons I was initially hopeful about Service Workers.
Thankfully, since Datasette is built on the principles of progressive enhancement this doesn’t matter: the application remains usable even if none of the JavaScript enhancements are applied.
I have an open issue for this. I welcome suggestions as to how I can get all of Datasette’s existing JavaScript working in the new environment with as little effort as possible.
Bonus: Testing it with shot-scraper
In building Datasette Lite, I’ve committed to making Pyodide a supported runtime environment for Datasette. How can I ensure that future changes I make to Datasette—accidentally introducing a new dependency that doesn’t work there for example—don’t break in Pyodide without me noticing?
This felt like a great opportunity to exercise my shot-scraper CLI tool, in particular its ability to run some JavaScript against a page and pass or fail a CI job depending on if that JavaScript throws an error.
Pyodide needs you to run it from a real web server, not just an HTML file saved to disk—so I put together a very scrappy shell script which builds a Datasette wheel package, starts a localhost file server (using python3 -m http.server), then uses shot-scraper javascript to execute a test against it that installs Datasette from the wheel using micropip and confirms that it can execute a simple SQL query via the JSON API.
Here’s the script in full, with extra comments:
#!/bin/bash
set -e
# I always forget to do this in my bash scripts - without it, any
# commands that fail in the script won't result in the script itself
# returning a non-zero exit code. I need it for running tests in CI.

# Build the wheel - this generates a file with a name similar to
# dist/datasette-0.62a0-py3-none-any.whl
python3 -m build

# Find the name of that wheel file, strip off the dist/
wheel=$(basename $(ls dist/*.whl))
# $wheel is now datasette-0.62a0-py3-none-any.whl

# Create a blank index page that loads Pyodide
echo '
<script src="https://cdn.jsdelivr.net/pyodide/v0.20.0/full/pyodide.js"></script>
' > dist/index.html

# Run a localhost web server for that dist/ folder, in the background
# so we can do more stuff in this script
cd dist
python3 -m http.server 8529 &
cd ..

# Now we use shot-scraper to run a block of JavaScript against our
# temporary web server. This will execute in the context of that
# index.html page we created earlier, which has loaded Pyodide
shot-scraper javascript http://localhost:8529/ "
async () => {
  // Load Pyodide and all of its necessary assets
  let pyodide = await loadPyodide();
  // We also need these packages for Datasette to work
  await pyodide.loadPackage(['micropip', 'ssl', 'setuptools']);
  // We need to escape the backticks because of Bash escaping rules
  let output = await pyodide.runPythonAsync(\`
    import micropip
    // This is needed to avoid a dependency conflict error
    await micropip.install('h11==0.12.0')
    // Here we install the Datasette wheel package we created earlier
    await micropip.install('http://localhost:8529/$wheel')
    // These imports avoid Pyodide errors importing datasette itself
    import ssl
    import setuptools
    from datasette.app import Datasette
    // num_sql_threads=0 is essential or Datasette will crash, since
    // Pyodide and WebAssembly cannot start threads
    ds = Datasette(memory=True, settings={'num_sql_threads': 0})
    // Simulate a hit to execute 'select 55 as itworks' and return the text
    (await ds.client.get(
      '/_memory.json?sql=select+55+as+itworks&_shape=array'
    )).text
  \`);
  // The last expression in the runPythonAsync block is returned, here
  // that's the text returned by the simulated HTTP response to the JSON API
  if (JSON.parse(output)[0].itworks != 55) {
    // This throws if the JSON API did not return the expected result
    // shot-scraper turns that into a non-zero exit code for the script
    // which will cause the CI task to fail
    throw 'Got ' + output + ', expected itworks: 55';
  }
  // This gets displayed on the console, with a 0 exit code for a pass
  return 'Test passed!';
}
"

# Shut down the server we started earlier, by searching for and killing
# a process that's running on the port we selected
pkill -f 'http.server 8529'More recent articles
- Kimi K3, and what we can still learn from the pelican benchmark - 16th July 2026
- The new GPT-5.6 family: Luna, Terra, Sol - 9th July 2026
- sqlite-utils 4.0, now with database schema migrations - 7th July 2026