shot-scraper: automated screenshots for documentation, built on Playwright
10th March 2022
shot-scraper is a new tool that I’ve built to help automate the process of keeping screenshots up-to-date in my documentation. It also doubles as a scraping tool—hence the name—which I picked as a complement to my git scraping and help scraping techniques.
Update 13th March 2022: The new shot-scraper javascript command can now be used to scrape web pages from the command line.
Update 14th October 2022: Automating screenshots for the Datasette documentation using shot-scraper offers a tutorial introduction to using the tool.
The problem
I like to include screenshots in documentation. I recently started writing end-user tutorials for Datasette, which are particularly image heavy (for example).
As software changes over time, screenshots get out-of-date. I don’t like the idea of stale screenshots, but I also don’t want to have to manually recreate them every time I make the tiniest tweak to the visual appearance of my software.
Introducing shot-scraper
shot-scraper is a tool for automating this process. You can install it using pip like this:
pip install shot-scraper
shot-scraper install
That second shot-scraper install line will install the browser it needs to do its job—more on that later.
You can use it in two ways. To take a one-off screenshot, you can run it like this:
shot-scraper https://simonwillison.net/ -o simonwillison.png
Or if you want to take a set of screenshots in a repeatable way, you can define them in a YAML file that looks like this:
- url: https://simonwillison.net/
  output: simonwillison.png
- url: https://www.example.com/
  width: 400
  height: 400
  quality: 80
  output: example.jpg
And then use shot-scraper multi to execute every screenshot in one go:
% shot-scraper multi shots.yml
Screenshot of 'https://simonwillison.net/' written to 'simonwillison.png'
Screenshot of 'https://www.example.com/' written to 'example.jpg'
The documentation describes all of the available options you can use when taking a screenshot.
Each option can be provided to the shot-scraper one-off tool, or can be embedded in the YAML file for use with shot-scraper multi.
JavaScript and CSS selectors
The default behaviour for shot-scraper is to take a full page screenshot, using a browser width of 1280px.
For documentation screenshots you probably don’t want the whole page though—you likely want to create an image of one specific part of the interface.
The --selector option allows you to specify an area of the page by CSS selector. The resulting image will consist just of that part of the page.
What if you want to modify the page in addition to selecting a specific area?
The --javascript option lets you pass in a block of JavaScript code which will be injected into the page and executed after the page has loaded, but before the screenshot is taken.
The combination of these two options—also available as javascript: and selector: keys in the YAML file—should be flexible enough to cover the custom screenshot case for documentation.
A complex example
To prove to myself that the tool works, I decided to try replicating this screenshot from my tutorial.
I made the original using CleanShot X, manually adding the two pink arrows:

This is pretty tricky!
- It’s not this whole page, just a subset of the page
- The cog menu for one of the columns is open, which means the cog icon needs to be clicked before taking the screenshot
- There are two pink arrows superimposed on the image
I decided to do use just one arrow for the moment, which should hopefully result in a clearer image.
I started by creating my own pink arrow SVG using Figma:
![]()
I then fiddled around in the Firefox developer console for quite a while, working out the JavaScript needed to trim the page down to the bit I wanted, open the menu and position the arrow.
With the JavaScript figured out, I pasted it into a YAML file called shot.yml:
- url: https://congress-legislators.datasettes.com/legislators/executive_terms?start__startswith=18&type=prez
  javascript: |
    new Promise(resolve => {
      // Run in a promise so we can sleep 1s at the end
      function remove(el) { el.parentNode.removeChild(el);}
      // Remove header and footer
      remove(document.querySelector('header'));
      remove(document.querySelector('footer'));
      // Remove most of the children of .content
      Array.from(document.querySelectorAll('.content > *:not(.table-wrapper,.suggested-facets)')).map(remove)
      // Bit of breathing room for the screenshot
      document.body.style.marginTop = '10px';
      // Add a bit of padding to .content
      var content = document.querySelector('.content');
      content.style.width = '820px';
      content.style.padding = '10px';
      // Open the menu - it's an SVG so we need to use dispatchEvent here
      document.querySelector('th.col-executive_id svg').dispatchEvent(new Event('click'));
      // Remove all but table header and first 11 rows
      Array.from(document.querySelectorAll('tr')).slice(12).map(remove);
      // Add a pink SVG arrow
      let div = document.createElement('div');
      div.innerHTML = `<svg width="104" height="60" fill="none" xmlns="http://www.w3.org/2000/svg">
        <g filter="url(#a)">
          <path fill-rule="evenodd" clip-rule="evenodd" d="m76.7 1 2 2 .2-.1.1.4 20 20a3.5 3.5 0 0 1 0 5l-20 20-.1.4-.3-.1-1.9 2a3.5 3.5 0 0 1-5.4-4.4l3.2-14.4H4v-12h70.6L71.3 5.4A3.5 3.5 0 0 1 76.7 1Z" fill="#FF31A0"/>
        </g>
        <defs>
          <filter id="a" x="0" y="0" width="104" height="59.5" filterUnits="userSpaceOnUse" color-interpolation-filters="sRGB">
              <feFlood flood-opacity="0" result="BackgroundImageFix"/>
              <feColorMatrix in="SourceAlpha" values="0 0 0 0 0 0 0 0 0 0 0 0 0 0 0 0 0 0 127 0" result="hardAlpha"/>
              <feOffset dy="4"/>
              <feGaussianBlur stdDeviation="2"/>
              <feComposite in2="hardAlpha" operator="out"/>
              <feColorMatrix values="0 0 0 0 0 0 0 0 0 0 0 0 0 0 0 0 0 0 0.25 0"/>
              <feBlend in2="BackgroundImageFix" result="effect1_dropShadow_2_26"/>
              <feBlend in="SourceGraphic" in2="effect1_dropShadow_2_26" result="shape"/>
          </filter>
        </defs>
      </svg>`;
      let svg = div.firstChild;
      content.appendChild(svg);
      content.style.position = 'relative';
      svg.style.position = 'absolute';
      // Give the menu time to finish fading in
      setTimeout(() => {
        // Position arrow pointing to the 'facet by this' menu item
        var pos = document.querySelector('.dropdown-facet').getBoundingClientRect();
        svg.style.left = (pos.left - pos.width) + 'px';
        svg.style.top = (pos.top - 20) + 'px';
        resolve();
      }, 1000);
    });
  output: annotated-screenshot.png
  selector: .content
And ran this command to generate the screenshot:
shot-scraper multi shot.yml
The generated annotated-screenshot.png image looks like this:
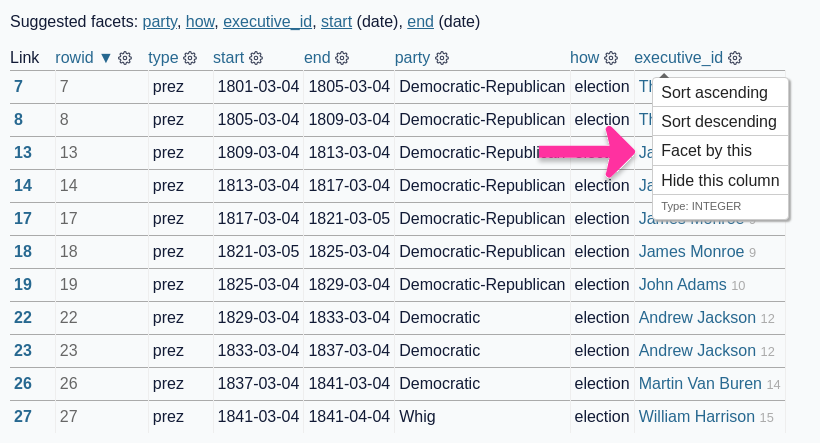
I’m pretty happy with this! I think it works very well as a proof of concept for the process.
How it works: Playwright
I built the first prototype of shot-scraper using Puppeteer, because I had used that before.
Then I noticed that the puppeteer-cli package I was using hadn’t had an update in two years, which reminded me to check out Playwright.
I’ve been looking for an excuse to learn Playwright for a while now, and this project turned out to be ideal.
Playwright is Microsoft’s open source browser automation framework. They promote it as a testing tool, but it has plenty of applications outside of testing—screenshot automation and screen scraping being two of the most obvious.
Playwright is comprehensive: it downloads its own custom browser builds, and can run tests across multiple different rendering engines.
The second prototype used the Playwright CLI utility instead, executed via npx:
subprocess.run(
    [
        "npx",
        "playwright",
        "screenshot",
        "--full-page",
        url,
        output,
    ],
    capture_output=True,
)
This could take a full page screenshot, but that CLI tool wasn’t flexible enough to take screenshots of specific elements. So I needed to switch to the Playwright programmatic API.
I started out trying to get Python to generate and pass JavaScript to the Node.js library... and then I spotted the official Playwright for Python package.
pip install playwright
It’s amazing! It has the exact same functionality as the JavaScript library—the same classes, the same methods. Everything just works, in both languages.
I was curious how they pulled this off, so I dug inside the playwright Python package in my site-packages folder... and found it bundles a full Node.js binary executable and uses it to bridge the two worlds! What a wild hack.
Thanks to Playwright, the entire implementation of shot-scraper is currently just 181 lines of Python code—it’s all glue code tying together a Click CLI interface with some code that calls Playwright to do the actual work.
I couldn’t be more impressed with Playwright. I’ll definitely be using it for other projects—for one thing, I think I’ll finally be able to add automated tests to my Datasette Desktop Electron application.
Hooking shot-scraper up to GitHub Actions
I built shot-scraper very much with GitHub Actions in mind.
My shot-scraper-demo repository is my first live demo of the tool.
Once a day, it runs this shots.yml file, generates two screenshots and commits them back to the repository.
One of them is the tutorial screenshot described above.
The other is a screenshot of the list of “recently spotted owls” from this page on owlsnearme.com. I wanted a page that would change on an occasional basis, to demonstrate GitHub’s neat image diffing interface.
I may need to change that demo though! That page includes “spotted 5 hours ago” text, which means that there’s almost always a tiny pixel difference, like this one (use the “swipe” comparison tool to watch 6 hours ago change to 7 hours ago under the top left photo).
Storing image files that change frequently in a free repository on GitHub feels rude to me, so please use this tool cautiously there!
What’s next?
I had ambitious plans to add utilities to the tool that would help with annotations, such as adding pink arrows and drawing circles around different elements on the page.
I’ve shelved those plans for the moment: as the demo above shows, the JavaScript hook is good enough. I may revisit this later once common patterns have started to emerge.
So really, my next step is to start using this tool for my own projects—to generate screenshots for my documentation.
I’m also very interested to see what kinds of things other people use this for.
More recent articles
- OpenAI’s accidental cyberattack against Hugging Face is science fiction that happened - 22nd July 2026
- A Fireside Chat with Cat and Thariq from the Claude Code team - 21st July 2026
- Kimi K3, and what we can still learn from the pelican benchmark - 16th July 2026