Analyzing my Twitter followers with Datasette
28th January 2018
I decided to do some ad-hoc analsis of my social network on Twitter this afternoon… and since everything is more fun if you bundle it up into a SQLite database and publish it to the internet I performed the analysis using Datasette.
The end result
Here’s the Datasette database containing all of my Twitter followers: https://simonw-twitter-followers.now.sh/simonw-twitter-followers-b9bff3a
Much more interesting though are the queries I can now run against it. A few examples:
- Search my followers (their name, bio and location), return results ordered by follower count. This is a parameterized query—here are the resuts for django.
- Whe are my most influential followers based on their own follower count?
- For all of my “verified” followers, who are following the least numbers of people themselves?
- Sort my followers by their friend-to-follower ratio
- In which years did my followers first join Twitter?
- What are the most common locations for my followers?
- The most common language setting for my followers—13,504 en, 403 es, 257 fr, 172 pt etc
- What are the most common time zones for followers with different languages? This is another parameterized query—here are the results for en, es, fr.
The thing I find most exciting about this use-case for Datasette is that it allows you to construct entire mini-applications using just a SQL query encoded in a URL. Type queries into the textarea, iterate on them until they do something useful, add some :named parameters (which generate form fields) and bookmark the resulting URL. It’s an incredibly powerful way to build custom interfaces for exploring data.
The rest of this post will describe how I pulled the data from Twitter and turned it into a SQLite database for publication with Datasette.
Fetching my followers
To work with the Twitter API, we first need credentials. Twitter still mostly uses the OAuth 1 model of authentication which is infuriatingly complicated, requiring you to sign parameters using two pairs of keys and secrets. OAuth 2 mostly uses a single access token sent over TLS to avoid the signing pain, but Twitter’s API dates back to the times when API client libraries with robust TLS were not a safe assumption.
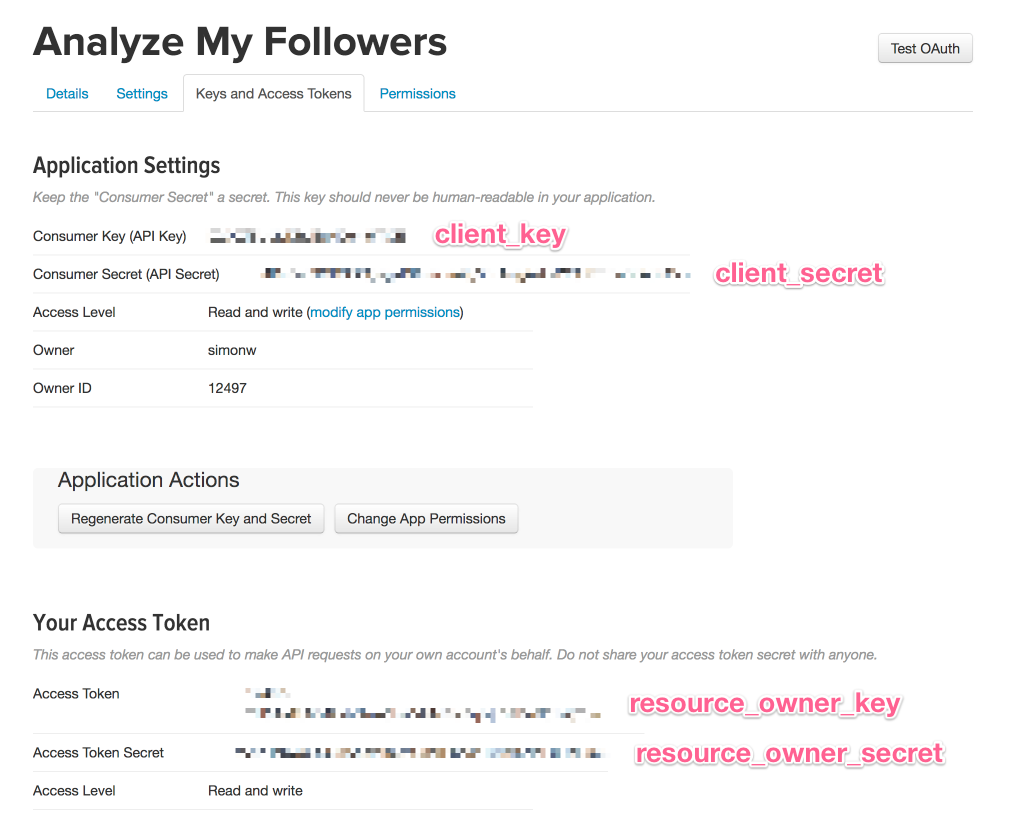
Since I have to re-figure out the Twitter API every few years, here’s how I got it working this time. I created a new Twitter app using the form on https://apps.twitter.com/ (which is surprisingly hard to find if you start out on the https://developer.twitter.com/ portal). Having created the app I navigated to the “Keys and Access Tokens” tab, scrolled down and clicked the “Create my access token” button. Then I grabbed the four magic tokens from the following spots on the page:

Now in Python I can make properly signed calls to the Twitter API like so:
from requests_oauthlib import OAuth1Session
twitter = OAuth1Session(
    client_key='...',
    client_secret='...',
    resource_owner_key='...',
    resource_owner_secret='...'
)
print(twitter.get(
    'https://api.twitter.com/1.1/users/show.json?screen_name=simonw'
).json())
The Twitter API has an endpoint for retrieving everyone who follows an account as a paginated JSON list: followers/list. At some point in the past few years Twitter got really stingy with their rate limits—most endpoints, including followers/list only allow 15 requests every 15 minutes! You can request up to 200 followers at a time, but with 15,000 followers that meant the full fetch would take 75 minutes. So I set the following running in a Jupyter notebook and went for a walk with the dog.
from requests_oauthlib import OAuth1Session
import urllib.parse
import time

twitter = OAuth1Session(...)
url = 'https://api.twitter.com/1.1/followers/list.json'

def fetch_followers(cursor=-1):
    r = twitter.get(url + '?'+ urllib.parse.urlencode({
        'count': 200,
        'cursor': cursor
    }))
    return r.headers, r.json()

cursor = -1
users = []
while cursor:
    headers, body = fetch_followers(cursor)
    print(headers)
    users.extend(body['users'])
    print(len(users))
    cursor = body['next_cursor']
    time.sleep(70)
A couple of hours later I had a users list with 15,281 user dictionaries in it. I wrote that to disk for safe keeping:
import json
json.dump(users, open('twitter-followers.json', 'w'), indent=4)
Converting that JSON into a SQLite database
I wrote some notes on How to turn a list of JSON objects into a Datasette using Pandas a few weeks ago. This works really well, but we need to do a bit of cleanup first: Pandas prefers a list of flat dictionaries, but the Twitter API has given us back some nested structures.
I won’t do a line-by-line breakdown of it, but here’s the code I ended up using. The expand_entities() function replaces Twitter’s ugly t.co links with their expanded display_url alternatives—then clean_user() flattens a nested user into a simple dictionary:
def expand_entities(s, entities):
    for key, ents in entities.items():
        for ent in ents:
            if 'url' in ent:
                replacement = ent['expanded_url'] or ent['url']
                s = s.replace(ent['url'], replacement)
    return s

def clean_user(user):
    if user['description'] and 'description' in user['entities']:
        user['description'] = expand_entities(
            user['description'], user['entities']['description']
        )
    if user['url'] and 'url' in user['entities']:
        user['url'] = expand_entities(user['url'], user['entities']['url'])
    if 'entities' in user:
        del user['entities']
    if 'status' in user:
        del user['status']

for user in users:
    clean_user(user):
I now have a nice flat list of users dictionaries—a subset of which is provided here for illustration.
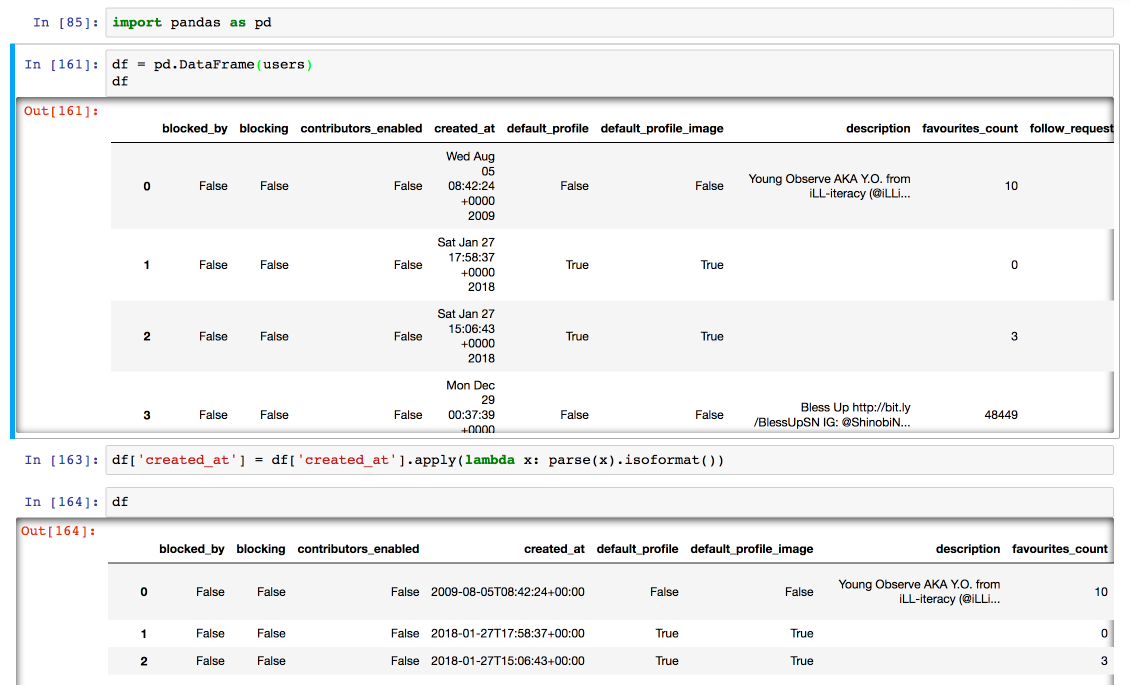
One additional step: SQLite’s built-in functions for handling date and time prefer ISO formatted timestamps, but previewing the DataFrame in Jupyter shows that the data I pulled from Twitter has dates in a different format altogether. I can fix this with a one-liner using the ever-handy dateutil library:
from dateutil.parser import parse
import pandas as pd
df = pd.DataFrame(users)
df['created_at'] = df['created_at'].apply(lambda s: parse(s).isoformat())
Here’s the before and after:

Now that the list contains just simple dictionaries, I can load it into a Pandas DataFrame and convert it to a SQLite table like so:
import sqlite3
conn = sqlite3.connect('/tmp/followers.db')
df.to_sql('followers', conn)
conn.close()
Now I can run datasette /tmp/followers.db to preview what I’ve got so far.
Extracting columns and setting up full-text search
This all works fine, but it’s not quite the finished product I demonstrated above. My desired final state has two additional features: common values in the lang, location, time_zone and translator_type columns have been pulled out into lookup tables, and I’ve enabled SQLite full-text search against a subset of the columns.
Normally I would use the -c and -f arguments to my csvs-to-sqlite tool to do this (see my write-up here), but that tool only works against CSV files on disk. I want to work with an in-memory Pandas DataFrame.
So I reverse-engineered my own code and figured out how to apply the same transformations from an interactive Python prompt instead. It ended up looking like this:
from csvs_to_sqlite import utils

conn = sqlite3.connect('/tmp/simonw-twitter-followers.db')

# Define columns I want to refactor:
foreign_keys = {
    'time_zone': ('time_zone', 'value'),
    'translator_type': ('translator_type', 'value'),
    'location': ('location', 'value'),
    'lang': ('lang', 'value'),
}
new_frames = utils.refactor_dataframes(conn, [df], foreign_keys)

# Save my refactored DataFrame to SQLite
utils.to_sql_with_foreign_keys(
    conn, new_frames[0], 'followers',
    foreign_keys, None, index_fks=True
)

# Create the full-text search index across these columns:
fts = ['screen_name', 'description', 'name', 'location']
utils.generate_and_populate_fts(conn, ['followers'], fts, foreign_keys)

conn.close()
Final step: publishing with Datasette
Having run datasette /tmp/simonw-twitter-followers.db to confirm locally that I got the results I was looking for, the last step was to publish it to the internet. As always, I used Zeit Now via the datasette publish command for this final step:
tmp $ datasette publish now simonw-twitter-followers.db \
    --title="@simonw Twitter followers, 27 Jan 2018"
> Deploying /private/var/.../datasette under simonw
> Ready! https://datasette-cmpznehuku.now.sh (copied to clipboard) [14s]
> Synced 2 files (11.29MB) [0ms]
> Initializing…
> Building
> ▲ docker build
Sending build context to Docker daemon 11.85 MBkB
> Step 1 : FROM python:3
...
> Deployment complete!
Then I ran new alias to assign a permanent, more memorable URL:
now alias https://datasette-cmpznehuku.now.sh simonw-twitter-followers.now.sh
More recent articles
- The evolution of OpenAI's mission statement - 13th February 2026
- Introducing Showboat and Rodney, so agents can demo what they’ve built - 10th February 2026
- How StrongDM's AI team build serious software without even looking at the code - 7th February 2026