Automating screenshots for the Datasette documentation using shot-scraper
14th October 2022
I released shot-scraper back in March as a tool for keeping screenshots in documentation up-to-date.
It’s very easy for feature screenshots in documentation for a web application to drift out-of-date with the latest design of the software itself.
shot-scraper is a command-line tool that aims to solve this.
You can use it to take one-off screenshots like this:
shot-scraper https://latest.datasette.io/ --height 800
Or you can define multiple screenshots in a single YAML file—let’s call this shots.yml:
- url: https://latest.datasette.io/
  height: 800
  output: index.png
- url: https://latest.datasette.io/fixtures
  height: 800
  output: database.png
And run them all at once like this:
shot-scraper multi shots.yml
This morning I used shot-scraper to replace all of the existing screenshots in the Datasette documentation with up-to-date, automated equivalents.
I decided to use this as an opportunity to create a more detailed tutorial for how to use shot-scraper for this kind of screenshot automation project.
Four screenshots to replace
Datasette’s documentation included four screenshots that I wanted to replace with automated equivalents.
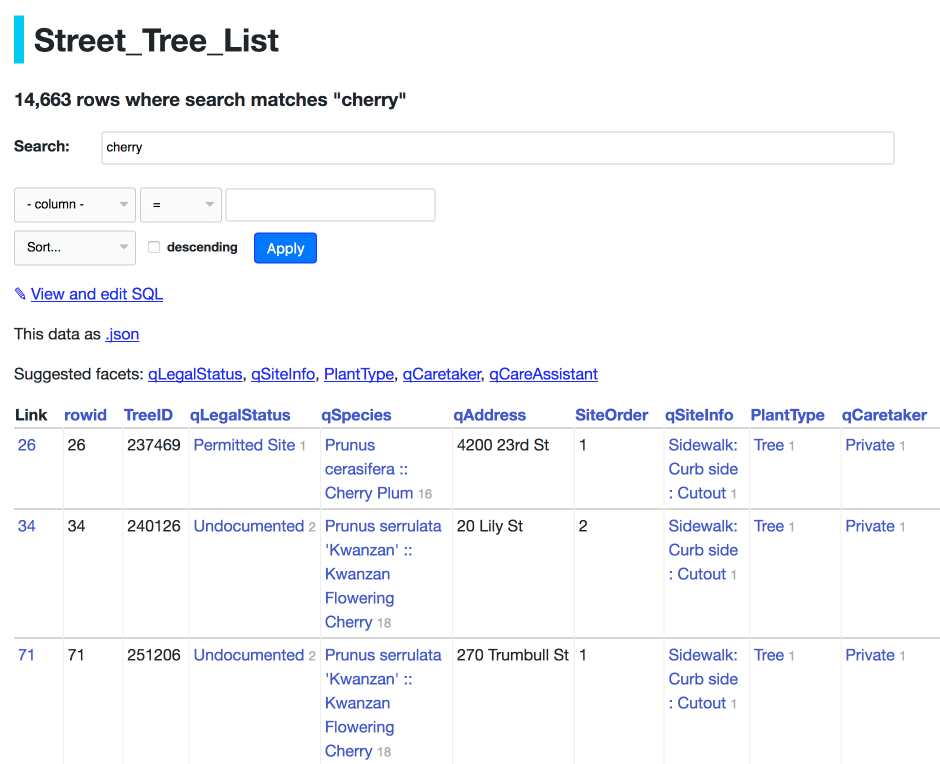
full_text_search.png illustrates the full-text search feature:
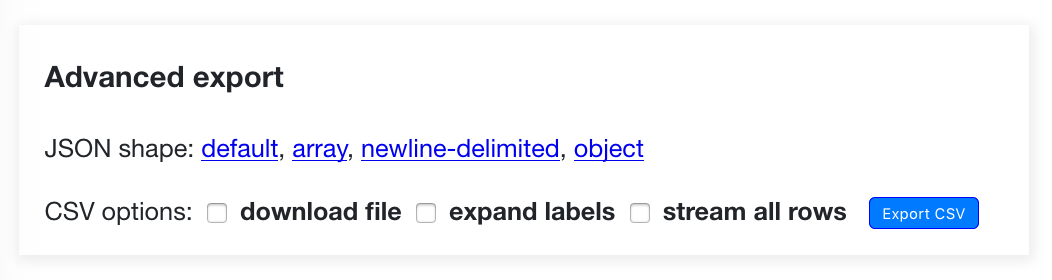
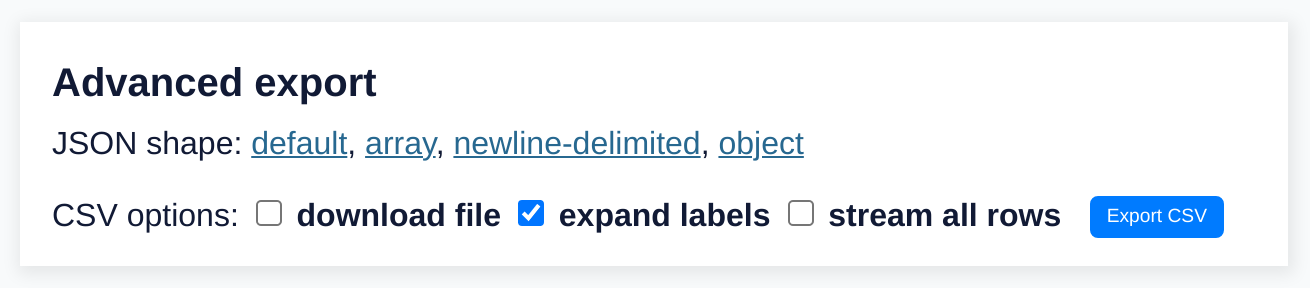
advanced_export.png displays Datasette’s “advanced export” dialog:
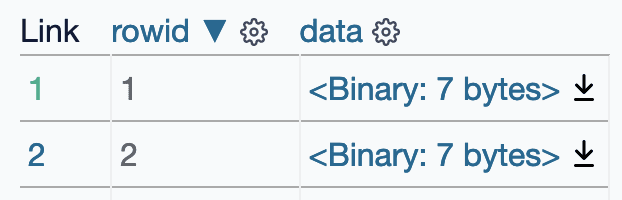
binary_data.png displays just a small fragment of a table with binary download links:
facets.png demonstrates faceting against a table:

I’ll walk through each screenshot in turn.
full_text_search.png
I decided to use a different example for the new screenshot, because I don’t currently have a live instance for that table running against the most recent Datasette release.
I went with https://register-of-members-interests.datasettes.com/regmem/items?_search=hamper&_sort_desc=date—a search against the UK register of members interests for “hamper” (see Exploring the UK Register of Members Interests with SQL and Datasette).
The existing image in the documentation was 960 pixels wide, so I stuck with that and tried a few iterations until I found a height that I liked.
I installed shot-scraper and ran the following, in my /tmp directory:
shot-scraper 'https://register-of-members-interests.datasettes.com/regmem/items?_search=hamper&_sort_desc=date' \
  -h 585 \
  -w 960
This produced a register-of-members-interests-datasettes-com-regmem-items.png file which looked good when I opened it in Preview.
I turned that into the following YAML in my shots.yml file:
- url: https://register-of-members-interests.datasettes.com/regmem/items?_search=hamper&_sort_desc=date
  height: 585
  width: 960
  output: regmem-search.png
Running shot-scraper multi shots.yml against that file produced this regmem-search.png image:

advanced_export.png
This next image isn’t a full page screenshot—it’s just a small fragment of the page.
shot-scraper can take partial screenshots based on one or more CSS selectors. Given a CSS selector the tool draws a box around just that element and uses that to take the screenshot—adding optional padding.
Here’s the recipe for the advanced export box—I used the same register-of-members-interests.datasettes.com example for it as this had enough rows to trigger all of the advanced options to be displayed:
shot-scraper 'https://register-of-members-interests.datasettes.com/regmem/items?_search=hamper' \
  -s '#export' \
  -p 10
The -p 10 here specifies 10px of padding, needed to capture the drop shadow on the box.
Here’s the equivalent YAML:
- url: https://register-of-members-interests.datasettes.com/regmem/items?_search=hamper
  selector: "#export"
  output: advanced-export.png
  padding: 10
And the result:
binary_data.png
This screenshot required a different trick.
I wanted to take a screenshot of the table on this page.
The full table looks like this, with three rows:
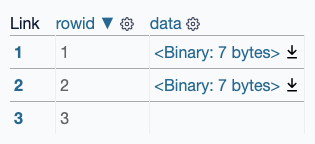
I only wanted the first two of these to be shown in the screenshot though.
shot-scraper has the ability to execute JavaScript on the page before the screenshot is taken. This can be used to remove elements first.
Here’s the JavaScript I came up with to remove all but the first two rows (actually the first three, because the table header counts as a row too):
Array.from(
  document.querySelectorAll('tr:nth-child(n+3)'),
  el => el.parentNode.removeChild(el)
);
I did it this way so that if I add any more rows to that test table in the future the code will still remove everything but the first two.
The CSS selector tr:nth-child(n+3) selects all rows that are not the first three (one header plus two content rows).
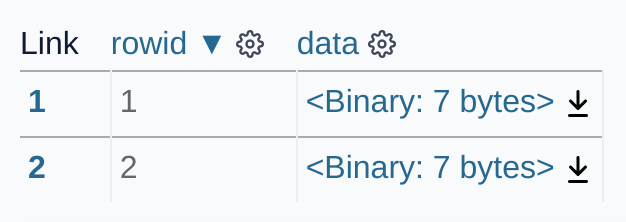
Here’s how to run that from the command-line, and then take a 10 pixel padded screenshot of just the table on the page after it has been modified by the JavaScript:
shot-scraper 'https://latest.datasette.io/fixtures/binary_data' \
  -j 'Array.from(document.querySelectorAll("tr:nth-child(n+3)"), el => el.parentNode.removeChild(el));' \
  -s table -p 10
The YAML I added to shots.yml:
- url: https://latest.datasette.io/fixtures/binary_data
  selector: table
  javascript: |-
    Array.from(
      document.querySelectorAll('tr:nth-child(n+3)'),
      el => el.parentNode.removeChild(el)
    );
  padding: 10
  output: binary-data.png
And the resulting image:
facets.png
I left the most complex screenshot to last.
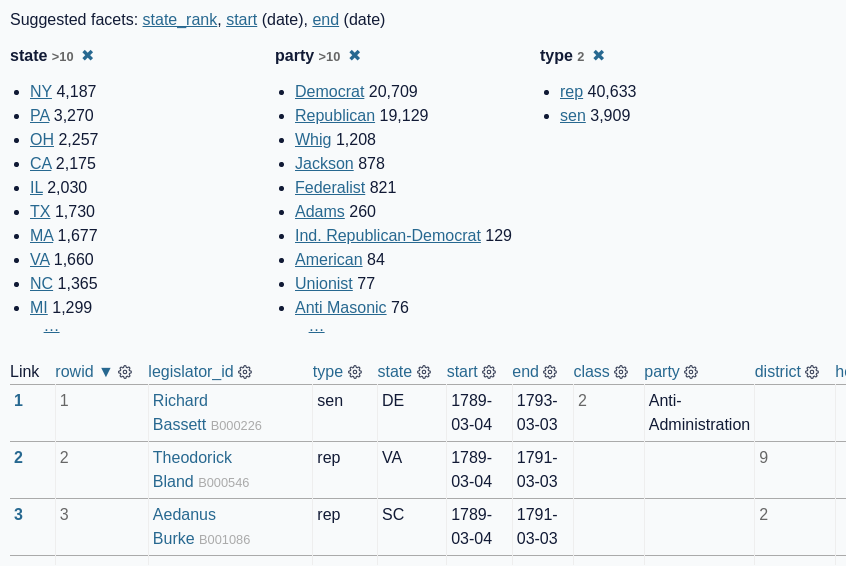
For the faceting screenshot, I wanted to include the “suggested facet” links at the top of the page, a set of active facets and then the first three rows of the following table.
But... the table has quite a lot of columns. For a neater screenshot I only wanted to include a subset of columns in the final shot.
Here’s the screenshot I ended up taking:
And the YAML recipe:
- url: https://congress-legislators.datasettes.com/legislators/legislator_terms?_facet=type&_facet=party&_facet=state&_facet_size=10
  selectors_all:
  - .suggested-facets a
  - tr:not(tr:nth-child(n+4)) td:not(:nth-child(n+11))
  padding: 10
  output: faceting-details.png
The key trick I’m using here is that selectors_all list.
The usual shot-scraper selector option finds the first element on the page matching the specified CSS selector and takes a screenshot of that.
--selector-all—or the YAML equivalent selectors_all—instead finds EVERY element that matches any of the specified selectors and draws a bounding box containing all of them.
I wanted that bounding box to surround a subset of the table cells on the page. I used this CSS selector to indicate that subset:
tr:not(tr:nth-child(n+4)) td:not(:nth-child(n+11))
Here’s what GPT-3 says if you ask it to explain the selector:
Explain this CSS selector:
tr:not(tr:nth-child(n+4)) td:not(:nth-child(n+11))
This selector is selecting all table cells in rows that are not the fourth row or greater, and are not in columns that are the 11th column or greater.
(See also this TIL.)
Automating everything using GitHub Actions
Here’s the full shots.yml YAML needed to generate all four of these screenshots:
- url: https://register-of-members-interests.datasettes.com/regmem/items?_search=hamper&_sort_desc=date
  height: 585
  width: 960
  output: regmem-search.png
- url: https://register-of-members-interests.datasettes.com/regmem/items?_search=hamper
  selector: "#export"
  output: advanced-export.png
  padding: 10
- url: https://congress-legislators.datasettes.com/legislators/legislator_terms?_facet=type&_facet=party&_facet=state&_facet_size=10
  selectors_all:
  - .suggested-facets a
  - tr:not(tr:nth-child(n+4)) td:not(:nth-child(n+11))
  padding: 10
  output: faceting-details.png
- url: https://latest.datasette.io/fixtures/binary_data
  selector: table
  javascript: |-
    Array.from(
      document.querySelectorAll('tr:nth-child(n+3)'),
      el => el.parentNode.removeChild(el)
    );
  padding: 10
  output: binary-data.png
Running shot-scraper shots shots.yml against this file takes all four screenshots.
But I want this to be fully automated! So I turned to GitHub Actions.
A while ago I created a template repository for setting up GitHub Actions to take screenshots using shot-scraper and write them back to the same repo. I wrote about that in Instantly create a GitHub repository to take screenshots of a web page.
I had previously used that recipe to create my datasette-screenshots repository—with its own shots.yml file.
So I added the new YAML to that existing file, committed the change, waited a minute and the result was all four images stored in that repository!
My datasette-screenshots workflow actually has two key changes from my default template. First, it takes every screenshot twice—once as a retina image and once as a regular image:
    - name: Take retina shots
      run: |
        shot-scraper multi shots.yml --retina
    - name: Take non-retina shots
      run: |
        mkdir -p non-retina
        cd non-retina
        shot-scraper multi ../shots.yml
        cd ..
This provides me with both a high quality image and a smaller, faster-loading image for each screenshot.
Secondly, it runs oxipng to optimize the PNGs before committing them to the repo:
    - name: Optimize PNGs
      run: |-
        oxipng -o 4 -i 0 --strip safe *.png
        oxipng -o 4 -i 0 --strip safe non-retina/*.png
The shot-scraper documentation describes this pattern in more detail.
With all of that in place, simply committing a change to the shots.yml file is enough to generate and store the new screenshots.
Linking to the images
One last problem to solve: I want to include these images in my documentation, which means I need a way to link to them.
I decided to use GitHub to host these directly, via the raw.githubusercontent.com domain—which is fronted by the Fastly CDN.
I care about up-to-date images, but I also want different versions of the Datasette documentation to reflect the corresponding design in their screenshots—so I needed a way to snapshot those screenshots to a known version.
Repository tags are one way to do this.
I tagged the datasette-screenshots repository with 0.62, since that’s the version of Datasette that the screenshots were taken for.
This gave me the following URLs for the images:
- https://raw.githubusercontent.com/simonw/datasette-screenshots/0.62/advanced-export.png (retina)
- https://raw.githubusercontent.com/simonw/datasette-screenshots/0.62/non-retina/regmem-search.png
- https://raw.githubusercontent.com/simonw/datasette-screenshots/0.62/binary-data.png (retina)
- https://raw.githubusercontent.com/simonw/datasette-screenshots/0.62/non-retina/faceting-details.png
To save on page loading time I decided to use the non-retina URLs for the two larger images.
Here’s the commit that updated the Datasette documentation to link to these new images (and deleted the old images from the repo).
You can see the new images in the documentation on these pages:
More recent articles
- Weeknotes: Llama 3, AI for Data Journalism, llm-evals and datasette-secrets - 23rd April 2024
- Options for accessing Llama 3 from the terminal using LLM - 22nd April 2024
- AI for Data Journalism: demonstrating what we can do with this stuff right now - 17th April 2024
- Three major LLM releases in 24 hours (plus weeknotes) - 10th April 2024
- Building files-to-prompt entirely using Claude 3 Opus - 8th April 2024
- Running OCR against PDFs and images directly in your browser - 30th March 2024
- llm cmd undo last git commit - a new plugin for LLM - 26th March 2024
- Building and testing C extensions for SQLite with ChatGPT Code Interpreter - 23rd March 2024
- Claude and ChatGPT for ad-hoc sidequests - 22nd March 2024
- Weeknotes: the aftermath of NICAR - 16th March 2024